My wife's Z was getting a tad hard to start so I figured I'd better check the valves. there was a recent post where the guy stated that he had never done it and did not know how so I figured I'd snap some pictures as I went and maybe help somebody out.
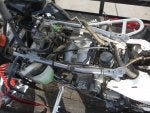
Here's the quad-2004 400. It's a great quad and my wife loves it.
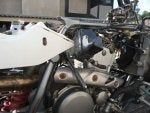
The first step is to remove the front plastics and fuel tank.
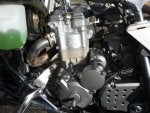
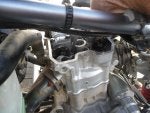
Then pull the plug wire and breather hoses. This is also where the $9.99 Harbor Freight allen socket set comes in handy. There will be 4 different size allen bolts to deal with. Remove the plugs from the side. Then remove the valve cover. Make sure it's clean or you'll get dirt in your top-end when you fanagle it out of there.
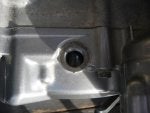
Then use a 17mm socket to rotate the engine to TDC. There is a line with a "T" next to it in the inpection hole. You want to line up on the line. Not the "T".
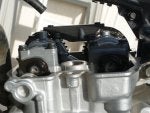
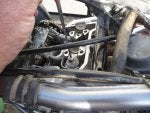
The cam lobes will look like this if it is correct. This is TDC on the compression stroke. Also take a look at exactly how the sprockets look on the other side. Take a picture so you can remember how those arrows went.
Then use an angled (preferred, I've used a flat and it seems to be fine) feeler gauge to check the "lash". That's the little gap between the top of the tappet and the cam lobe.
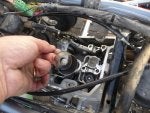
UH-oh one of the intake valves is out and only has a hair of a gap. The other is just barely within spec. Now I have to remove the cam chain tensioner (uh-oh again...almost out of adjustment, need to order a DID for this one!). I moved the black box out of the way to get at the cam chain tensioner. Remove the bolt and spring in the middle first then the whole thing by removing the two allen bolts. Try to remove it carefully so you don't rip the gasket that is on there. Usually they come of fine though.
Now you need to remove the allen bolts holding the cam journals on. I loosened the exhaust side a bit cause the one that has the chain cover has to come out all the way. The two bolts on the chain side of the exhaust cam journal are longer...DON'T MIX THESE UP!
With the four bolts hoding the intake cam journal removed you can then remove the journal and the cam. Do not move the timing or exhaust cam and just lift out the intake cam without disturbing the chain on the exaust cam sprocket. If removing both you'll want to wire that chain up so that it can't fall down inside the engine.
Now I use my 99 cent telescoping magnet (Harbor Freight again") ) to remove the tappet bucket.
) to remove the tappet bucket.
Watch out for the shim, it is probably stuck inside the bucket.
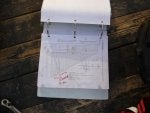
So this one is a 2.75 and I have less then .04 gap so using the chart
in the service manual I know that I need to install a 2.65.
Like I said the other side is barely in spec so I drop down to the next smaller size shim on that one while I'm in there.
Here's a handy on-line tool to help figure out shim sizes. Don't mix up mm with inches.
Calculator[/url]
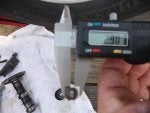
I couldn't read the size.......I guess I must have put it in with the markings down, so I use my $12.99 micrometer (yep you guessed it, Harbor Freight) to check what shim this is.
So I know that I want a 2.85 in place of that one.
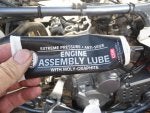
Good to go now. At this point it's pretty much everything in reverse. Use plenty of assembly lube on all moving parts. Use a 1/4" torque wrench on the journal bolts. They only torque to 7 lbs. Do not overtighten the bolts that hold the top cover on either. I have a helicoil kit if you do though..........:lol
There are obviously some holes in this little narrative. It's just meant to help those with no clue (like me) and supplement what's not explained too well in the service manual.
Hope it helps. Maybe it could get pinned.
Link below is to a valve shim calculator. It makes it very easy.
Valve Shim Calculator
Here's the quad-2004 400. It's a great quad and my wife loves it.
The first step is to remove the front plastics and fuel tank.
Then pull the plug wire and breather hoses. This is also where the $9.99 Harbor Freight allen socket set comes in handy. There will be 4 different size allen bolts to deal with. Remove the plugs from the side. Then remove the valve cover. Make sure it's clean or you'll get dirt in your top-end when you fanagle it out of there.
Then use a 17mm socket to rotate the engine to TDC. There is a line with a "T" next to it in the inpection hole. You want to line up on the line. Not the "T".
The cam lobes will look like this if it is correct. This is TDC on the compression stroke. Also take a look at exactly how the sprockets look on the other side. Take a picture so you can remember how those arrows went.
Then use an angled (preferred, I've used a flat and it seems to be fine) feeler gauge to check the "lash". That's the little gap between the top of the tappet and the cam lobe.
UH-oh one of the intake valves is out and only has a hair of a gap. The other is just barely within spec. Now I have to remove the cam chain tensioner (uh-oh again...almost out of adjustment, need to order a DID for this one!). I moved the black box out of the way to get at the cam chain tensioner. Remove the bolt and spring in the middle first then the whole thing by removing the two allen bolts. Try to remove it carefully so you don't rip the gasket that is on there. Usually they come of fine though.
Now you need to remove the allen bolts holding the cam journals on. I loosened the exhaust side a bit cause the one that has the chain cover has to come out all the way. The two bolts on the chain side of the exhaust cam journal are longer...DON'T MIX THESE UP!
With the four bolts hoding the intake cam journal removed you can then remove the journal and the cam. Do not move the timing or exhaust cam and just lift out the intake cam without disturbing the chain on the exaust cam sprocket. If removing both you'll want to wire that chain up so that it can't fall down inside the engine.
Now I use my 99 cent telescoping magnet (Harbor Freight again
) to remove the tappet bucket.Watch out for the shim, it is probably stuck inside the bucket.
So this one is a 2.75 and I have less then .04 gap so using the chart
in the service manual I know that I need to install a 2.65.
Like I said the other side is barely in spec so I drop down to the next smaller size shim on that one while I'm in there.
Here's a handy on-line tool to help figure out shim sizes. Don't mix up mm with inches.
Calculator[/url]
I couldn't read the size.......I guess I must have put it in with the markings down, so I use my $12.99 micrometer (yep you guessed it, Harbor Freight) to check what shim this is.
So I know that I want a 2.85 in place of that one.
Good to go now. At this point it's pretty much everything in reverse. Use plenty of assembly lube on all moving parts. Use a 1/4" torque wrench on the journal bolts. They only torque to 7 lbs. Do not overtighten the bolts that hold the top cover on either. I have a helicoil kit if you do though..........:lol
There are obviously some holes in this little narrative. It's just meant to help those with no clue (like me) and supplement what's not explained too well in the service manual.
Hope it helps. Maybe it could get pinned.
Link below is to a valve shim calculator. It makes it very easy.
Valve Shim Calculator